Tuesday, May 21, 2013
Luke Mendola's project presentation
This evening I went to York lecture hall in IHS to spectate my fellow WISE student presenting his project. Luke's project was learning to play the harmonica, if that was his only goal that he is an overachiever. Not only did Luke learn to play the harmonica, but he gave a detailed background of the instrument, taught us how they work, and even had a live jam session with another WISE student who played the guitar! After watching Luke's presentation I though a lot about mine. I need more visual aids. I'm thinking about bringing in various tools that I found helpful, and because my presentation will be preformed to a much smaller audience, I will be able to pass around parts and important objects from my project. I will begin a creating a slide show soon, and practice presenting to ensure that I meet the time constraints. Overall, I though Luke's presentation was extremely well done, I can't vouch for his Narrative or his journal, but his presentation was A+ material.
Oil filter and Case in!
Today I installed the new oil filter and cover plate CORRECTLY. I adjusted the cover plate to the appropriate 22 Foot pounds of force. The cast aluminum did not snap as it did before, but firmly set in place creating a snug seam in between the Filter plate and the engine block.
This is the old filter, and broken cover plate sitting next to the new filter and cover plate,


This is the old filter, and broken cover plate sitting next to the new filter and cover plate,
This is the new plate and filter after being installed
Friday, May 17, 2013
problems, problems problems...
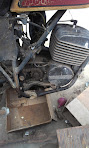
This is a view of the bottom of the engine, the hole is where the oil filter goes, and there is a cover that is connected to the broken stem within the hole in this photo. I broke the stem by over tightening the oil filter cover, this was a mistake on my half, after reading the owners manual, I learned that only 22 Foot Pounds of force was required to fasten the cover. The stem is currently broke off inside the filter port, It's extremely hard to remove even with pliers. Oil runs through the down stem (broken) and the holes in the stem allow oil to be released where is is forced to run through the paper filter. With a broken stem, there is no way to fasten the oil filter in place nor the cover plate. I ordered another oil filter case, It should be here by Monday but either way, this problem will put me behind schedule.


Thursday, May 16, 2013
Presentation Date set, Reality kicks in.
On Monday, I scheduled to present my WISE project. The presentation date is currently Wednesday, May 29th at 345 in Ms. Lords' room at Ithaca High School. I'm extremely nervous about this presentation, I haven't even began to organize a slideshow, or make any form of visual aid. The papers that are also required are due by May 22, that is merely 6 days away. There are other stressful aspects of school that are preventing me from making further progress on this project. Tomorrow I have my AP Human Geography test, which has consumed much of my time. After this test I will be able to dedicate much of my time to my WISE project. There have been other technical issues with the bike that will be extremely difficult to fix by May 29.
Wednesday, May 8, 2013
Motorcycle Value Research
Today, I was told by a friend of my mothers (john) that I may be able to have my bike appraised online at NADAguids.com. After visiting the website and specifying the year, make, and model, the website displayed these results:
(Value according to condition)
Excellent: $1655
Very good: $1180
Good: $710
Fair: 405
Poor: N/A
I determined that because the motorcycle has been stored inside although there are still problems, the condition it is currently in is "good". That means the value of the bike is around $710 (will be when project is finished). My next step is to call the bonding agency and see if NADAguide.com is an acceptable source.
Sunday, May 5, 2013
The legal scavenger hunt
The past week I have been undergoing a scavenger hunt, but with no fun involved, only my gas, and precious time. I knew from the beginning that getting the title would be hard, multiple trips to varies agencies and shops in and around Ithaca would be involved, but I did not know how genuinely angry I would get when told "Sorry sir, you're in the wrong line" or "A surety bond? I have no idea what that is, I'd go back to the DMV if I were you."
In the month, I've been to the DMV twice, Andrews Agency Insurance once, An online bonding agencies site or phone call 3 times, and yet I still have made ZERO headroom on the Title for this motorcycle. Evidently my next step is to have a dealership appraise my bike, so I can tell the Price to the bonding agency and we can get this ball rolling. One exception though, the dealership I spoke with (Goldsport Suzuki) said I needed to bring the bike in for them to actually physically appraise it. I was expecting the Kelly BlueBook value, not a full inspection, if they appraise the bike in its current state they will say it's scrap metal! Tomorrow I will call Goldsport and talk with Jerry (the owner) who is a personal friend of my father and I think he can appraise the bike without me bringing it in. I'm crossing my fingers that after this, the bonding process is smooth sailing.
In the month, I've been to the DMV twice, Andrews Agency Insurance once, An online bonding agencies site or phone call 3 times, and yet I still have made ZERO headroom on the Title for this motorcycle. Evidently my next step is to have a dealership appraise my bike, so I can tell the Price to the bonding agency and we can get this ball rolling. One exception though, the dealership I spoke with (Goldsport Suzuki) said I needed to bring the bike in for them to actually physically appraise it. I was expecting the Kelly BlueBook value, not a full inspection, if they appraise the bike in its current state they will say it's scrap metal! Tomorrow I will call Goldsport and talk with Jerry (the owner) who is a personal friend of my father and I think he can appraise the bike without me bringing it in. I'm crossing my fingers that after this, the bonding process is smooth sailing.
Need motivation? Declare a deadline
I agree with many parts of this article, but not all. Deadlines are good motivators for some, but if your like me, regardless of when the deadline is, the task will not be finished until the night before. I think that it is more important to set small goals within a big deadline. IN the Author of this article's case, she should have publicly announced a deadline, and then privately rationed the task into a series of small goals, this would make the article she promised a much easier job. Deadlines are beneficial for some and detrimental and embarrassing for others, they appear to be a good life skill and it's something I need to improve at.
(As I finished the article I realized one of the final paragraphs address' my suggestion above, whoops)
(As I finished the article I realized one of the final paragraphs address' my suggestion above, whoops)
Happiness revisited
1.) I feel most happy with an empty mind. I'm not misunderstanding the question, some people say achievements makes them happy, others think that tangible objects make them happy, but I simply think that being stress free makes me happiest. Not having to conform to a deadline, or worry about disappointing someone else is the best feeling in the world. This is part of the reason why I love summer, even though I work in the summer, I'm a self employed vegetable farmer, which means that the only person I would be disappointing is myself (well, the customers and workers too). I find a perfect balance of responsibility in the summer and that balance makes me happy.
2.) This article talks about how happiness and "flow" go hand in hand. I interpreted flow as how happy you are making yourself, without outside interference's. Being in a state of flow means you are completely focused and nothing can distract you, It doesn't need to be productive, as long as it makes you satisfied. This article explains how there is no way to accurately write about flow and have it relate to each reader, because each reader finds flow in different things.
3) I fall in between A1 and A4, just below the flow channel (If we're talking about my WISE project). I came in to this project with too much knowledge of the topic, as a result I get bored easily and unmotivated. This mindset results in a downward spiral of productivity. The more I think about my project, the easier I think it is, thus; the less I work on it.
4.) Toward the beginning of my WISE project I knew that some aspects of the project would be tedious and boring (The freaking DMV). Although, I though with the right mindset I could power through these obstacles. Unfortunately, I've lost drive with these tasks, I'm almost out of resources (money) and it's making me less and less interested the legal area of my WISE project.
5.) I think I can achieve flow better by setting smaller goals before the large ones. I need to make getting the bike appraised my first goal, then I can move my goal to taking the appraisal to the bonding agency, and ultimately I can make my goal obtaining a title from the bonding agency. Either way, my goals are too big and non-tangible to tackle all at once, It's time to reevaluate them.
Monday, April 29, 2013
A place where my comfort is preventing me from learning
This journal entry has thinking, and I've realized that the majority of this project is in the comfort zone and very few aspects of restoring this bike have made me uncomfortable. The only part that has pushed my comfort zone so far has been the multiple trips to the DMV (most of which have been a waste of time). It's not that I feel out of place or intimidated while in the DMV, It's the atmosphere that makes me feel uncomfortable The attitudes are hostile and I feel like I'm constantly being glared at by the clerk, or some other suspicious looking fella who is struggling to fill out the Sudoku puzzles the DMV calls "standard forms". Regardless of how uncomfortable I am there, or how much I will learn by going, the DMV definitely pushes my comfort zone.
Oil Change/ Battery solution!
So I drained all of the old engine oil from the bike a few days ago. That night I realized that if I'm going to change the oil I better change the oil filter, so I indeed ordered another filter. The filter was only about $15.00 on ebay and it looks like its been lightly used or just sitting around someones garage for a while. The filter arrived yesterday and sometime this week I plan on installing it.
 this is a photo of the oil draining, notice the bright yellow color (this is abnormal)
The Battery!
Good news! My previous diagnosis of the battery was incorrect. I thought the $90.00 battery I bought in the summer was fried because I left it on the charger for too long, when instead the charger I was trying to use was broken. My neighbor has a small trickle battery charger that will slowly charge motorcycle batteries over the course of a night so the battery doesn't get fried by a high voltage normal charger. I plan on borrowing this charger sometime this week.
this is a photo of the oil draining, notice the bright yellow color (this is abnormal)The Battery!
Good news! My previous diagnosis of the battery was incorrect. I thought the $90.00 battery I bought in the summer was fried because I left it on the charger for too long, when instead the charger I was trying to use was broken. My neighbor has a small trickle battery charger that will slowly charge motorcycle batteries over the course of a night so the battery doesn't get fried by a high voltage normal charger. I plan on borrowing this charger sometime this week.
Sunday, April 28, 2013
Expense list
price ($)
|
source
|
Blog post date
| |
Air Filter
|
20.64
|
JCWhiteny.com
|
4/10/13
|
Copper BB’s
|
Free
|
Dicks
|
4/10/13
|
Oil Filter
|
16.25
|
Ebay
|
-
|
Oil (10-40)
|
22.98
|
Advanced Auto parts
|
-
|
Fuel filter
|
2.99
|
Advanced auto parts
|
4/14/13
|
Car Wash
|
5.00
|
Knapp’s carwash
|
4/28/13
|
Coil
|
20.00
|
Pick-A-Part
|
3/17/13
|
owners manual
|
free
|
scribd.com
|
3/17/13
|
dry gas
|
5.09
|
Advanced Auto parts
|
4/10/13
|
The finishing touches on the gas tank
After I used the dry gas and other alcohol based solutions (CLR, The works), there were still calcium buildups and other skitah (as my dad calls it) stuck to the inside of the tank. After reading about other peoples similar problems on the internet, I decided to try using a power washer. Ours was still winterized so I threw the tank into my truck and set off toward the car wash, I came prepared with $5.00 in quarters. First I used a soap cycle and then high pressure water. I was amazed at how much solid waste came out of the hole at the bottom of the tank (I removed the valve so the debris could be removed). Five dollars later, I now have a clean gas tank.
Sunday, April 21, 2013
Task force journal review
Ms. Maddren recently reviewed my wise journal and I am flattered for what she had to say. I was not surprised that she found the lists I am consistently making constructive. I feel they are a good way of staying organized and a and keep my goals in sight. Ms. Maddren advised me to journal more about research because it was not clear which information was prior knowledge and which I learned from my research. Overall I feel that Ms. Maddren's review of my journal was fair, all of her suggestions were very valid and her enthusiasm gave me a confidence boost!
Sunday, April 14, 2013
Chemicals, copper BB's and time, will that work?
Now that I have cleared the valve, and drained the gas, I can start attempting to remove the thick sludge and calcium build up that remains in the tank. I spend some time today researching different methods and I was shocked to find how many there are. I started today by dumping a bag of BB's in the tank, along with a half bottle of CLR and some dry gas, I shook the tank vigorously and left it sitting with the top on so the chemicals can soften the grime. Tomorrow I will shake more, and if it fails and there is still grime built up, I will powerwash the tank with hot water (I have a steam generator at my disposal).
Gas tank problem part 2
Unfortunately blogger was giving me a hard time when I tried to add more photos to my last post, So this is a continuation of the previous post.
 |
| When removing the valve, I realized that there was a silicone gasket that I peeled off, by accident. I went to advanced autoparts and bought paper gasket material and cut it in this shape. It permits the two fuel lines to poke through the gasket and go into the tank. When the screws are tightened, the valve, is pressed and sealed to the tank by the gasket. |
 |
| I reassembled the valve and removed the fuel filter because they (both the reserve and the main filter) because they were not salvageable. Here's the re assembled valve with the gasket!  |
The gas tank problem
So today I drained the gas tank, and began the cleaning process. The first step was to remove the tank from the frame, which was simple. Next I needed to drain the 18 year old gas that was trapped in there, I first tried opening the fuel valve over a bucket, but I quickly learned that the valve was clogged.
Below is a photo of the fuel valve once I removed it from the tank

Below is a photo of the fuel valve once I removed it from the tank
 |
| This is the disassembled valve, I cleaned it with a brush and carb and choke cleaner until all the grime was gone. |
Wednesday, April 10, 2013
Past due journal... The first of the legal hoops
The Tuesday (3/26) before I went on school break, I decided to begin the long process of obtaining an insurance bond so I can legally register my bike. After speaking with my dad, I decided to go to Andrews agency in downtown Ithaca. This insurance company sell all types of insurance, the woman in the office were very kind but unfortunately not very helpful. After explaining my situation to a representative, the woman told asked for my phone number and said she needed to call the DMV and familiarize herself with the bonding process before she could help. She took my phone number and said she would call me later that day, which never happened. I went on break the following week and was unable to make any process, but this week I plan on trying my luck at the same office, and if I find no success then I'll try another agency.
Some new stuff

Over the break, I did some brainstorming on what I tools, or parts I needed to get to reach my goals, and this is what I came up with. The plastic bags contain copper BB's a friend gave me. I plan on using the the BB's and the heet dry gas (alcohol solution, water remover) to clean the gas tank. The copper BB's, when inserted into gas tank along with the dry gas, and normal gasoline should create enough physical disturbance to knock loose any grime or calcium deposits. The alcohol solution and gasoline will create a chemical reaction that hopefully will thoroughly clean the inside of the tank. The box on the top is a new air filter. I purchased this before I went on break and when I came back it had arrived. I haven't tried to install it yet, I'm really hoping there are no parts that I am missing. If so, I'm sure I can fabricate them myself.


Above are two pictures of the gas tank, the calcium deposits are very obvious.
Tuesday, April 9, 2013
Far behind on Journal entries!
Dear Reader,
I would like to formally apologize for my spotty project updates. This past week for spring break I've been in Utah on a ski trip. Unfortunately I did not have either the bike or the internet so there was not much room for progress. Fortunately I accomplished a lot before I left and still have not blogged about, so here is a list of some accomplishments that I have not blogged about YET.
-Purchased new air filter
-Spoke with Insurance Representative
- purchased BB's and dry gas to clean tank with
- Drained oil
- attempted to install coil
Tuesday, March 26, 2013
Out of the rut planning
7 things I want to accomplish in the next week-
-Go speak with insurance company, take the next step in getting a "bond" for this bike
-Clean gas tank
-properly install coil
-test spark plugs
-order oil filter
-check fork oil levels/ fork seals
-Drain and replace oil (if oil filter comes)
4 people I would like to talk to/ things I need to get
-insurance salesman (for bond)
- My father (for coil information)
- Jimmy Everts (advice on how to clean gas tank)
- Foam air filter (ordered, not in yet)
- Oil filter
3 things I should talk with my mentor about
-Should I apply for financing assistance?
- Does Mr. Tompson know any local resources related to my project?
- What should I do over break, I'm going to Utah, I won't have internet or the bike, should I just work on my narrative?
7 things I want to further research
- How to synchronize the carburetors
- Is there any good liquid additives I can add to combat the rust in the gas tank?
- Good websites for parts for this model bike
- How do I replace the fork seals (if need be)
- How do I adjust the valves?
- If I take off the head, is it necessary to replace the head gasket?
- How do you take off the final drive belt?
- How do drum brakes work?
Monday, March 25, 2013
Jumpin through legal hoops
I knew from the start that obtaining the title for this bike would be a very long, tedious task. I recently began this process by bringing the only evidence of a title I have to the DMV, the super old licence plate. When I explained my problem to the clerk, her instant reaction was "oh jeez". I knew what I was in for, I was at the disposal of the DMV. The kind woman understood my situation, the bike was mine through a series of "under the table" transactions, and unfortunately I didn't have the documentation to prove it was mine. She gave me a sheet of paper telling me what to do, the first step was to contact an insurance company for a "bond". What this bond does, is ensure that if the original owner hunts me down, and says I stole this bike, the insurance company will pay him the value of the bike instead of me. My next step would be to talk with my father and ask if I can use his insurance company because rates on a vehicle, especially a motorcycle for an 18 year old boy are outrageous.
Sunday, March 17, 2013
The Tear down

today I broke down the bike to a certain extent. I removed the gas tank, side covers, and seat. This exposed the battery (which needed a charge), and the airbox. I removed the left coil (the dysfunctional one), and took it to my friend who has a voltmeter. A voltmeter detects how much voltage is being produced from the coil, the results answered my question. Not nearly enough voltage was being produced to ignite the spark plug, so I set out for a new coil.

This is the final drive belt that I was worried about. These belts are rare and expensive, I was relieved to see that there were no weather cracks and the belt still looked strong.
I finally remembered to take a photo of my work space, It's a little tight, but cozy and cleaner than the rest of the garage.

4th mentor meeting 3/11/13
I felt guilty walking into see my mentor this time. I felt like I did not do enough to progress my project in the time that we have not seen each other. All I've done was some simple diagnostic tests with the bike. I explained that the left cylinder is not igniting, (could be the coil), the fuel talk is disgusting because there has been stagnant gas trapped in there for years, the carburetor may need cleaning, and the cylinders need to be timed correctly.
From here, Mr. Tompson and I discussed my next steps, I needed to...
From here, Mr. Tompson and I discussed my next steps, I needed to...
- Check belts for corrosion (order new one if needed)
- Find ignition coil (the one I've had for a while and don't know if it will work on this bike)
- Clean fuel tank with BB's and anti corrosive spray
- print service manual
- look for a foam air filter
Got the Service manual

3rd mentor meeting, 3/4/13
So, once again I completely forgot to blog about my past 2 mentor meetings. The Sunday before my meeting with Mr. Tompson on 3/4/13, I spend a good deal of time in my garage thinking about how realistic my goals were. I concluded that due to a lack of parts and knowledge (service manual) restoring the 1976 Can-Am 250 was unrealistic. The following day I explained my reasons for wanting to shift projects to Mr. Tompson. I wanted to simply change bikes to a more common motorcycle that I already own, Mr. Tompson agreed that is a more realistic goal and we set out on a new list of chores. Sense I want to register this bike and have it street legal, we thought it would be smart make a trip to the DMV my priority. When at the DMV, I believe there is a "lost registration" form I can pick up and fill out for this bike, just to get the legal process underway. At this meeting we discussed the specs of the NEW bike, and I was happy to learn how knowledgeable Mr. Tompson was about this model. As it turns out he had a very similar bike only it was an inline 4 cylinder. We decided I needed more photos of the bike, and to narrow down what needs to be done so my week was spend diagnosing the bike.
Monday, March 11, 2013
Found an online service manual!
So I recharged the battery that I bought over the summer, and received the same results. Only 1 spark plug would ignite, I believe this is a problem with the ignition coil, what the coil does is convert the low voltage from the battery to a more powerful voltage which is needed to ignite the fuel mixture within the cylinder.I faintly remember my father telling me that he has a coil that would fit this model bike, although he is out of down and I am unable to find it myself. Knowing that I am not able to solve the coil issue myself, I moved on. After searching online for a while, I found an online service manual for this model bike. Although this manual is free to read online, if I wanted to download the PDF for printing it would cost 5 dollars.A Hard copy of a service manual is vital for engine work because no one wants to get their computer all greasy when they are reading. I plan on purchasing the manual and printing it in the school library (all 300 pages) if the librarian permits. When I was thumbing through the free online manual, I stumbled across the engine timing section. I learned that the timing must be re-adjusted whenever a ignition problem has affected 1 cylinder and not the other, (ex. the coil preventing one cylinder and not the other). I began by removing the contact breaker cover, and the alternator cover. This revealed the points, and crankshaft. I used a 14mm open end wrench to turn the crankshaft manually which caused the points to rotate and demonstrated how ignition timing worked. I did not proceed because I did not have a hard copy of the manual, and there was no sense in timing an engine that did not have a functional coil. My next step is to get the replacement coil from my father, install it, and then attempt to time the ignition.
Sunday, March 10, 2013
The Barn Build
Last Monday we watched a video from a former WISE student. This was a project within a project, It was a documentary (first project) about a kid building a timber frame barn (the second project). This video gave me an inside look at a WISE project and what it means to be a WISE student. The amount of freedom demonstrated in this video was inspiring. The student building the barn used many resources including his own capital, strangers, and family ties. I still wonder if this project requires this much time, money and resources or if this kid was an overachiever. Should our lives revolve around our WISE project as this kids did? My goals are not nearly as ambitious as this kids, although I do plan on accomplishing a lot. My main goal is to have a completely running 1981 CSR 305. Also, this bike is unregistered so I will need to jump through legal hoops to get the bike on the road. After watching this film, my goals seem obsolete and small. Compared to building a timber frame barn, getting a motorcycle running and street legal is simple.
Tuesday, March 5, 2013
Major project Revisions
Dear reader
So after speaking with my father and realistically reading over my project proposal, I've realized restoring this bike is simply out of my reach. Not because I'm not capable, but because parts for this bike are very rare and expensive. I've also recently acknowledged my fathers interest in the project. He was hesitant at first to permit me to do this project and I could tell that he wants to play a large role in the restoration of HIS Can-Am. I've decided to postpone this project until my father and I have both the time and resources to do this job correctly.
I still have interests in older motorcycles which leads me to my new WISE project. I also have a 1981 Kawasaki CSR 305, street motorcycle that has been stored in a barn for roughly 20 years and I would love to get this bike running, and legally on the road. I bought this bike from a friend over the summer for $200 and began trouble shooting immediately. Of the start, I bought a new battery to see what would happen if I tried to start it. Only one of the two spark plugs would ignite and the bike has been sitting since. I also remember other problems with the bike, there is no airbox/filter, dirty carbs, dirty gas tank (inside), the pistons need to be re-timed, and the drive belt may need to be replaced. I look forward to working on this bike because it seems simpler, and I'm not putting my fathers vintage dirt bike in jeopardy , only my $200 investment.
I think the most time consuming part of this project will be getting the motorcycle street legal. There was no paperwork when I bought the bike, so I will need to start at the DMV and see what they tell me to do. I do indeed have the licence plate that was on the bike last time it was registered, this may help me in tracking down the registration.

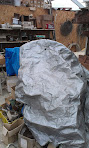
Sorry the photo is poor quality, I'll post more when I get the chance!
Thanks for reading!
So after speaking with my father and realistically reading over my project proposal, I've realized restoring this bike is simply out of my reach. Not because I'm not capable, but because parts for this bike are very rare and expensive. I've also recently acknowledged my fathers interest in the project. He was hesitant at first to permit me to do this project and I could tell that he wants to play a large role in the restoration of HIS Can-Am. I've decided to postpone this project until my father and I have both the time and resources to do this job correctly.
I still have interests in older motorcycles which leads me to my new WISE project. I also have a 1981 Kawasaki CSR 305, street motorcycle that has been stored in a barn for roughly 20 years and I would love to get this bike running, and legally on the road. I bought this bike from a friend over the summer for $200 and began trouble shooting immediately. Of the start, I bought a new battery to see what would happen if I tried to start it. Only one of the two spark plugs would ignite and the bike has been sitting since. I also remember other problems with the bike, there is no airbox/filter, dirty carbs, dirty gas tank (inside), the pistons need to be re-timed, and the drive belt may need to be replaced. I look forward to working on this bike because it seems simpler, and I'm not putting my fathers vintage dirt bike in jeopardy , only my $200 investment.
I think the most time consuming part of this project will be getting the motorcycle street legal. There was no paperwork when I bought the bike, so I will need to start at the DMV and see what they tell me to do. I do indeed have the licence plate that was on the bike last time it was registered, this may help me in tracking down the registration.
Sorry the photo is poor quality, I'll post more when I get the chance!
Thanks for reading!
Friday, March 1, 2013
My classmates WISE projects
I spent some time today looking over a few of my classmates' blog. It's good to know that I'm not the only one that feels like they're in over their heads. There are some really ambitious projects out there! One friend of mine is making a baseball bat for his WISE project, he showed me a small "stepping stone" project that he recently made. It was a pen made out of wood, the machine he used to make it is the same machine he will be making the bat with. Another friend of mine is exploring molecular gastronomy in foods. Today she brought in a cheesecake that will blow your mind! It's neat to check in on my friends projects, I can't wait until Monday to see what they have to say!
Somewhere to work
After school today, I went to the garage and began reorganizing. I needed to move a number of other motorcycles to make room for this new project. I moved most of our bikes to the back room of the garage, and then cleaned off an old office desk. I located the Can-Am next to the desk and this is the little area I plan on working in. I told my father my plan so hopefully he won't mess with my stuff because my goal is to keep my area as organized as possible. I'll post photos this weekend!
Thursday, February 28, 2013
What to do?
So I'm kinda stuck right now. I know it's pretty essential that I obtain the service manual for this bike. Much of the technical information like the valve timing, fluid information, carburetor adjustments, etc are in the service manual and its vital that I know that information. Well after hours of looking around my farm and my fathers old shop that he used when he was racing, I still could not find this manual; I then resorted to the internet. I couldn't find any online copies, but when I searched Ebay I found one. The manual I found on ebay is exactly what I need, a 1975 MX2 125-250 service manual. The only reason why I'm hesitating on buying this manual is that it's $50! Is it worth the price? Do I have any alternatives? I'm gonna sleep on it.
Thanks for reading!
-Cody
Canned-Ham, The go-to Can Am motorcycle website
Dear Reader
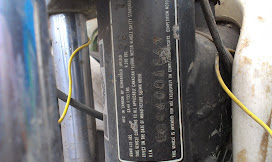
I found this website a couple of weeks back when I was researching for this project. Everything about this website is dedicated to Can-Am motorcycles, primarily the vintage ones like the one I'm working on. There's one section of this site that lists common technical problems of different model bikes. There's a lot of information about my model, the 1976 MX2-250. This is where I learned the various places serial numbers are placed on the bike. After finding the serial numbers I was able to search online and figure out that the engine is a 250, and the frame is a 125. When I asked my dad (the original owner) about the engine swap, he had no recollection of the engine swap. He said "That was too long ago and I've owned too many bikes in my day to remember that bike, sorry!" Anyway, this site is going to be a very valuable resource to me over the next few months.
I found this website a couple of weeks back when I was researching for this project. Everything about this website is dedicated to Can-Am motorcycles, primarily the vintage ones like the one I'm working on. There's one section of this site that lists common technical problems of different model bikes. There's a lot of information about my model, the 1976 MX2-250. This is where I learned the various places serial numbers are placed on the bike. After finding the serial numbers I was able to search online and figure out that the engine is a 250, and the frame is a 125. When I asked my dad (the original owner) about the engine swap, he had no recollection of the engine swap. He said "That was too long ago and I've owned too many bikes in my day to remember that bike, sorry!" Anyway, this site is going to be a very valuable resource to me over the next few months.
Wednesday, February 27, 2013
Second Mentor meeting 2/18/13
Dear Reader
I met with Mr. Thompson for the second time this past Monday (2/18/13). Due to some previous confusion, we had to re-exchange email address'. Mr. Thompson then viewed my blog, he suggested that I enlarge the photos I've taken. I explained my oil reservoir issue which I blogged about on 2/19/13. My mentor suggested that I try using a router or drill attachment with a brush on the end to break the foam loose, after it's broken loose we decided a vacuum could be the most helpful tool. We narrowed down the obvious fixes that could be done in a week and it came down to this:
I understand having all of these tasks accomplished in one week is unrealistic, so we listed these tasks so I have options. It is likely that I will get stuck or need assistance with a few of these tasks, if that occurs I can simply move on to the next problem that must be solved.
I met with Mr. Thompson for the second time this past Monday (2/18/13). Due to some previous confusion, we had to re-exchange email address'. Mr. Thompson then viewed my blog, he suggested that I enlarge the photos I've taken. I explained my oil reservoir issue which I blogged about on 2/19/13. My mentor suggested that I try using a router or drill attachment with a brush on the end to break the foam loose, after it's broken loose we decided a vacuum could be the most helpful tool. We narrowed down the obvious fixes that could be done in a week and it came down to this:
- Carburetor cleaning
- Oil Reservoir foam removal
- Ready the spare gas tank I found for use (clean)
- Drain all the fluids
- Look for a throttle assembly
I understand having all of these tasks accomplished in one week is unrealistic, so we listed these tasks so I have options. It is likely that I will get stuck or need assistance with a few of these tasks, if that occurs I can simply move on to the next problem that must be solved.
First Mentor meeting 2/11/13
Dear Reader,
As I've recently learned, I'm supposed to document each meeting I have with my mentor in a blog entry. I've had two meetings with my Mentor Keith Thompson thus far. I'll talk about my first meeting in this entry.
On 2/11/13 I had a meeting with Mr. Thompson, it was as this point that I explained exactly what my WISE project is. We discussed the current state the dirtbike, the specifications of this bike, and where I got it. I explained that the bike is a 2 stroke, single carburetor, and has not been ridden in at least 25 years. I told Mr. Thompson my plans for the next week which were to take detailed photographs of the bike, find the owners manual, and clear a spot in my garage and dedicate it to the bike. We decided to meet each week on Mondays, 3rd period in his office.
Tuesday, February 19, 2013
What I obviously need/ Newly found oil injection problem
This bike has been sitting in a greenhouse for at least 20 years. The sunlight has taken its toll on any plastics, rubber, and fabric. This is a list of things I can see I need to fix/ replace without any dis-assembly.
What I need (as of now).
Recently discovered problem with oil injection
This bike is a 2 stroke, meaning there are 2 revolutions of the pistons for each power-stoke. With all 2 stroke engines you must add oil into the gas, the oil acts as a lubricant for the piston within the cylinder. This specific bike does not require the rider to mix oil and gas. There is a separate tank in which oil is stored, this is located within the frame. The oil is fed into the gas line as needed, this makes the chances of adding the wrong amount of oil to gas less common. After much research I learned that within this oil tank, there is a foam like substance to prevent the oil from moving/ splashing during riding. This foam deteriorates overtime and if the bike is ran with loose foam in the oil tank, the foam will clog the carburetor.
I now need to extract the foam from the tank within the frame. The best way to do this (I believe) is to first, remove the gas tank. Now that the gas tank is removed, the area of the frame in which oil is stored is revealed. A wide hole should be drilled, wide enough to allow tools to access the tank and scrape the foam out. From here, it's a tedious process of vacuuming, scraping and washing the foam out of the frame through the hole I have recently drilled. After all the foam is removed, replacing the foam is not necessarily important because it did not serve an important purpose. From there, all there is left to do is weld a patch over the hole I just drilled.
What I need (as of now).
- Carburetor to air-box rubber boot. (This rubber boot is decomposing before my eyes)
- Front and Rear fenders
- Brake/ Clutch Cables
- Tires
- Throttle assembly and throttle cable
- All fluids (Transmission oil, engine oil, gas)
Recently discovered problem with oil injection
This bike is a 2 stroke, meaning there are 2 revolutions of the pistons for each power-stoke. With all 2 stroke engines you must add oil into the gas, the oil acts as a lubricant for the piston within the cylinder. This specific bike does not require the rider to mix oil and gas. There is a separate tank in which oil is stored, this is located within the frame. The oil is fed into the gas line as needed, this makes the chances of adding the wrong amount of oil to gas less common. After much research I learned that within this oil tank, there is a foam like substance to prevent the oil from moving/ splashing during riding. This foam deteriorates overtime and if the bike is ran with loose foam in the oil tank, the foam will clog the carburetor.
I now need to extract the foam from the tank within the frame. The best way to do this (I believe) is to first, remove the gas tank. Now that the gas tank is removed, the area of the frame in which oil is stored is revealed. A wide hole should be drilled, wide enough to allow tools to access the tank and scrape the foam out. From here, it's a tedious process of vacuuming, scraping and washing the foam out of the frame through the hole I have recently drilled. After all the foam is removed, replacing the foam is not necessarily important because it did not serve an important purpose. From there, all there is left to do is weld a patch over the hole I just drilled.
The first look
Today I went down to my garage to investigate the bike. I learned a lot that makes my research much easier. First off, by searching the serial online, I learned that the frame is from a 1975 MX 175, the engine is from a 1975 MX 250. Both of these bikes are far more common than the model I previously thought the bike was. After talking with my father I learned that behind our garage, somewhere, there is a 1975-78 Can-Am TnT 175 frame and engine. Although this is not the model of the bike I am restoring, many Can-Am parts are universal and if need be, I will use parts from this bike.


Thursday, February 7, 2013
First 2 week outline
Dear reader,
The first two weeks of my project, I plan to use as a diagnostic/ research period. I'm going to take the bike out from storage, check the fluids, see if there is any missing parts, and take photos of the bike. Toward the end of the two week period I will begin to set up my work area. I'm going to designate a space in my garage for this restoration that will be organized, clean and a space of my own. I want to start shopping for parts that I know I will need such as decals and tires, these should come easy although parts like the fenders, brake cables and seat may be difficult to obtain. These parts may have to be restored instead of replaced.
The first two weeks of my project, I plan to use as a diagnostic/ research period. I'm going to take the bike out from storage, check the fluids, see if there is any missing parts, and take photos of the bike. Toward the end of the two week period I will begin to set up my work area. I'm going to designate a space in my garage for this restoration that will be organized, clean and a space of my own. I want to start shopping for parts that I know I will need such as decals and tires, these should come easy although parts like the fenders, brake cables and seat may be difficult to obtain. These parts may have to be restored instead of replaced.
What it's all about
Dear reader,
This blog is to track the progress of my WISE English project. Wise is an English class offered at my high school. The first semester is devoted to normal English lessons (books, reports, etc.). In the second semester, we are given the freedom to create our own project. We are required to attend class once a week, the rest of the time we are supposed to be researching, journaling (blogging) and executing our project. At the end of the semester we present our project to a panel of people who grade my project. The grade is based on my timeliness, goal accomplishment, and organization.
I've been around dirt bikes my entire life because of my father, he was raced in the 70's and introduced them to me at a young age. I've always been fascinated with them and within the past few years, I started doing my own maintenance and teaching myself the mechanics of them.
My project is restoring a 1976 CanAm GP 250 dirtbike. My father raced Motocross in the 70's and this was his bike. I plan to make this bike function again, (it's been decades) and make it aesthetically pleasing too. I would like to refurbish the plastics, decals and the seat. The engine probably won't take too much to run, but I want more than a running engine, I want it to purr. I'll replace the gaskets, fluids, piston ring, and anything else that could prevent the bike from running well.
Thanks for reading! I'll post photo's of my progress!
- Cody
Subscribe to:
Posts (Atom)